
This guide to ICON is divided into the following sections:
Section 1: Getting started
Section 2: Creation of records
Section 3: Metadata
Section 4: Licences
Section 5: Publishers’ policies, print versions and embargo
Section 6: Copyrighted materials
Section 7: Persistent identifiers & DOI
Use the tab on the left to navigate to different sections.
A quick guide and overview of ICON video is also available here.
Log in and update your profile
1. Website: https://icon.suss.edu.sg/
2. Click the Log In link located at the top right corner.
3. Sign in with your SUSS credentials via Microsoft Single-Sign On (SSO). Refer to the FAQ on how to sign in for details
If this is your first login, you may want to update your profile before uploading any research outputs to help others understand your research interests and increase the visibility of your work within the academic community.
a. Click on the circular icon located at the top right corner of the screen.
b. From the dropdown menu, select Profile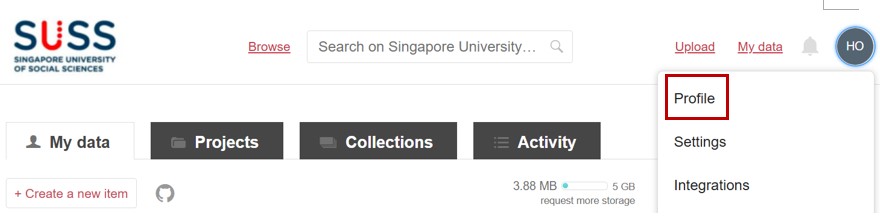
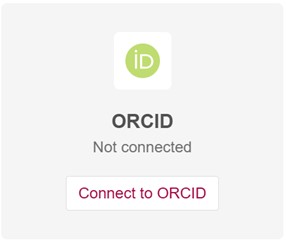
c. Enter or edit your information as appropriate. This is your public facing page. We recommend that you update and integrate your profile with ORCID to maximise the visibility of your research profile.
ORCID Integration:
All researchers are strongly encouraged to link your profile in ICON to an ORCID ID.

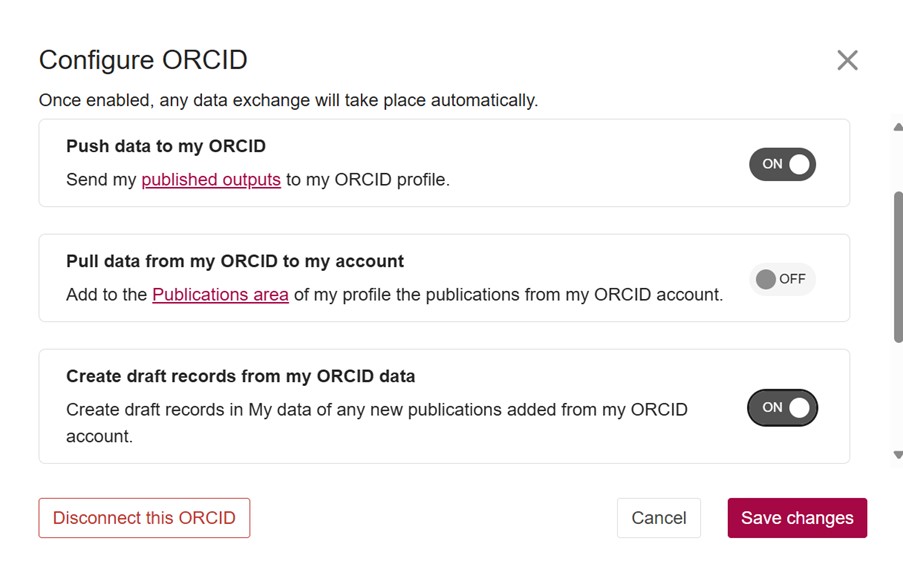
Upon completion, click the Save changes at the bottom of the page. Then, select View your public profile to preview how your information will be displayed.
SUSS is committed to upholding academic integrity, and any work submitted must be representative of the individual’s own effort, knowledge, and understanding of the subject matter.
You can contact SUSS Library at library@suss.edu.sg for clarifications:
Journal articles
To find out whether you can upload and save your published work as Open Access into ICON, you can consult the publisher’s website on their licence and copyright policies and guidelines, or verify the information using the JISC Open Policy Finder (formerly Sherpa) to ensure that the version uploaded aligns with the publisher’s guidelines. You can also check the publishers website for the information.
Books and book chapters
You can also check with the publishers directly on the version that you can deposit into our repository.
Working papers published by SUSS
You may deposit the final version of the papers into the depository
Postgraduate Dissertations
Final approved versions
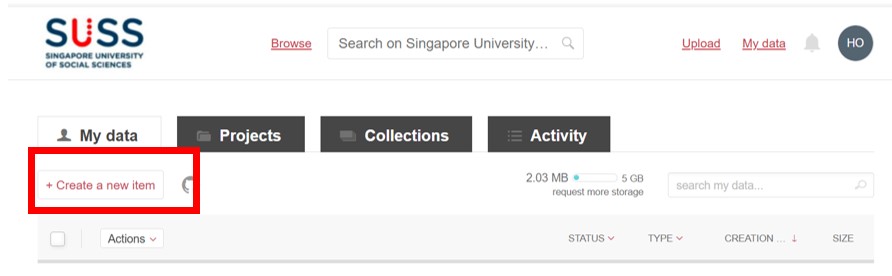
Create & upload a new item
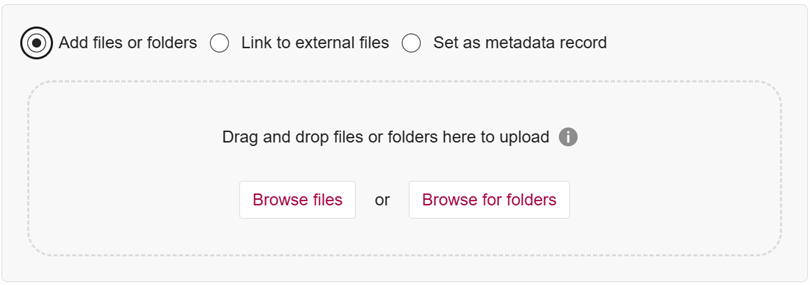
1. On My data tab, click on Create a new item
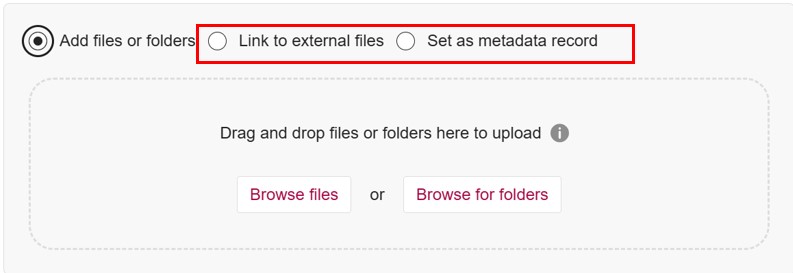
2. There are 3 options to create a record in the repository. Determine if the files can be uploaded and select the appropriate radio button.
(i) Select Add files or folders if you wish to upload a file or folders
(ii) Select Link to external files to link to an external site where the full text of the item (work) has been published online.
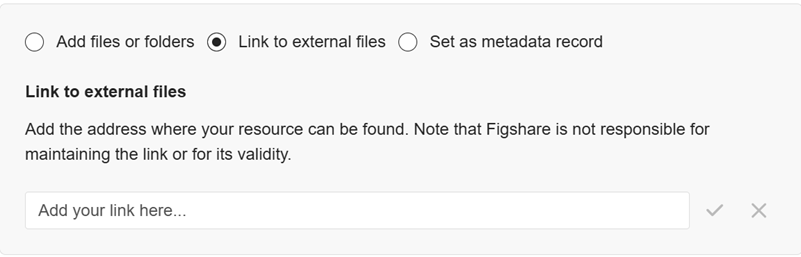
Once published, this is what the public will see, with the link:

(iii) Select Set as metadata record to create a metadata record which describes your data but does not require you to upload the associated files.
Once published, this is what the public will see with the reason stated.

Metadata is defined as data about data, which helps to describe, explain, and manage information. Please be as thorough as possible when providing the metadata to enable and enhance the discoverability of the resource.
The mandatory metadata are marked with a red asterisk *.
Item Title*: Provide a descriptive research title so that it is discoverable via search engine e.g. google.
School/Display Group*: Select the appropriate school/display group. For cross disciplinary research, more than one school/display group might be chosen.
Group and Item Type*: Click on the Change Group and select the appropriate content group. Selecting different Content Group will result in different Item Types and their corresponding metadata fields.
Once the content group is chosen, select the appropriate item types. Click on small 'i' icon for a brief description to help you decide on the suitable item type.
|
Content Groups |
Item types |
|
Book |
|
|
Conference |
|
|
Journal |
|
|
Theses |
|
Author*: If you are uploading on behalf of someone, remove your name and search for the author(s). If you wish to add a non-SUSS authors, select “Add author details.” Please note: Double-check that the email address is correct. After saving you will not be able to edit the details of this author.[MT1] [HO2]
Categories*: Select one or more from the drop-down menu based on the vendor’s standard classification scheme *for your subject area. If there is no suitable subject area, we recommend finding the closest option and providing specific keywords in the Keywords section.
*Source: The Australian and New Zealand Standard Research Classification (ANZSRC) Fields of Research
Keywords*: Add as many specific and relevant keywords as you want to make your research discoverable by others. Please hit enter after each keyword.
Description*: Provide clear, relevant and contextual information on the research, e.g. methodology, research objective, techniques used, etc. Be as descriptive as possible. The description must contain a minimum of four characters.
License*: Select the appropriate licence from the list. The license will determine how others can reuse your content. Click on small 'i' icon and click on the “View License Deed” link for more description on the licence.
We recommend selecting a Creative Commons or other open licence that supports broad reuse. Please refer to Licence section below to guide you on choosing an appropriate licence.
If your submission is subjected to a publisher’s copyright policy or you prefer not to apply an open licence, choose In Copyright from the drop-down menu. You can refer to the Copyrighted materials section for more information.
Publication Date / Year awarded (applicable to theses only) *: Enter the date of publication, date of document, date of public distribution or year the degree was award.
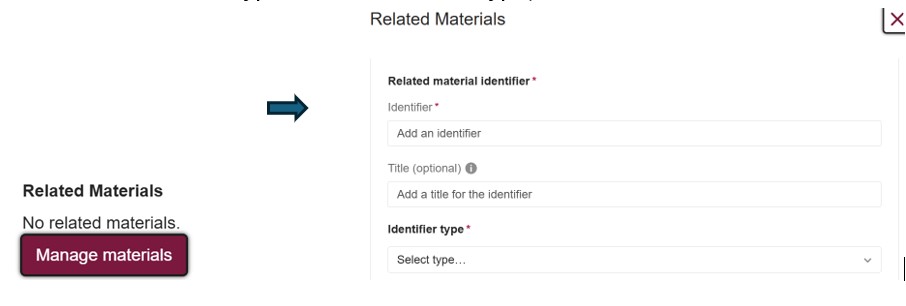
Related Materials (Optional): Use this field to link the deposited item to the related information, link to any papers, publications, or other outputs that the item informs, is informed by or is related to. Enter the identifier, select the appropriate identifier type, and choose the Relation Type.
Funding (Optional): Indicate the funding code.
Please note that the National Research Foundation, Singapore (NRF) requires all publications resulting from its funded research to be publicly accessible no later than 12 months after the official date of publication.
Before you indicate the licences, it is important to determine or verify the copyright type and ownership of your work by considering the following:
Creative Commons (CC) are a set of commonly used licence tools that allow creators to share their work with the public while retaining some rights. CC comprises of six licenses and the public domain dedication tool. The key elements of CC licences are:
BY (Attribution): Appropriate credit must be given to the creators, provide a link to the license, and indicate if changes were made
NC (Non-commercial): Only non-commercial uses of the work are permitted.
ND (No derivatives): No derivatives or adaptations of the work are permitted.
SA (Share-Alike): Adaptations must be shared and distributed under the same license as the original.
Please refer to the table below on the appropriate licence to use.
|
Tools |
Share |
Adapt |
Attribution required |
Commercial Use |
|
CC0 1.0 Public Domain |
Yes |
Yes |
No |
Yes |
|
CC-BY 4.0
|
Yes |
Yes |
Yes |
Yes |
|
CC-BY-SA 4.0 |
Yes |
Share-Alike |
Yes |
Yes |
|
CC-BY-ND 4.0 |
Yes |
No |
Yes |
Yes |
|
CC-BY-NC 4.0 |
Yes |
Yes |
Yes |
No |
|
CC-BY-NC-SA 4.0
|
Yes |
Share-Alike |
Yes |
No |
|
CC-BY-NC-ND 4.0
|
Yes |
No |
Yes |
No |
|
In Copyright |
No |
No |
No |
No |
The publishers’ website and the JISC Open Policy Finder can be used to verify publishers’ self-archiving policies and their copyright and reuse policies.
These policies would highlight the key elements:
Using embargo & restricted access to set different publishing and access options
The repository allows you to select an embargo duration and the embargo type on the files uploaded so that you can control when and what the files/records can be made publicly available.
You can either set the embargo time duration (e.g. 1 month, 3 months, 2 years, permanent) or enter a fixed date.
The two embargo types are:
If a Permanent Embargo is selected, only the metadata record will be visible to the public.
If possible, enter the embargo title and indicate the embargo reason such as publisher’s policy and copyrighted content, etc.

As an extension of the embargo, you can also determine who can access the embargoed content. There are two options available:
For copyrighted materials, always use the In copyright licence.
If a publisher has given the clearance to upload in the institutional repository, you may opt to upload the files and set the appropriate embargo period and embargo type. When in doubt, we recommend setting a longer embargo period or permanent embargo (with contact details). For embargo content, please email libadmin@suss.edu.sg on the details of the embargo.
If there is a restriction to upload the files in the institutional repository, you may opt to publish by linking to external files or set as metadata record only.
Where possible, use the persistent identifier DOI as the link to external files.
We recommend using the “Related Materials” to provide more contextual information on the items such as DOI link to the publisher’s version.
Enter the identifier (e.g. the identifier which is the URL link, the title associated with the URL, indicate the identifier type and the Relation type)
Case studies:
Example of a book chapter with metadata only record: Fauna: Vertebrates - Freshwater Fishes
Example of a journal contribution with metadata only record: Factors associated with practice readiness among newly qualified nurses in their first two years of practice.
Example of a conference contribution with embargo period record: Apple Snails as Bioindicators of Microplastic Pollution in Singapore's Freshwaters
Example of a book on permanent embargo: China and ASEAN: Pivoting Trade and Shock Transmission
A Persistent Identifier (PID) is a long-lasting digital reference to an object, contributor, or organisation. It is a link that will remain constant and it is a means of identifying a digital object and will always lead to it.
Commonly used PIDs in a typical institutional repository are the Open Researcher and Contributor ID (ORCID) and Digital Object Identifiers (DOI).
Digital Object Identifiers (DOI) is a “digital identifier of an object”. DOIs can be assigned to any object, whether physical, digital or abstract.
ICON assigns a DOI for all resources that are published. The “Manage Identifiers” function is located at the right side of the UI under Item actions.
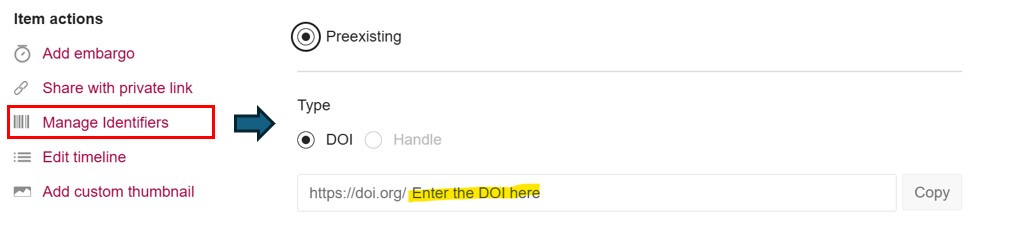
If this is a published resource, we recommend using the publisher’s DOI to ensure consistency across all platforms.
1. Select the radio button Preexisting.
2. Enter the DOI.
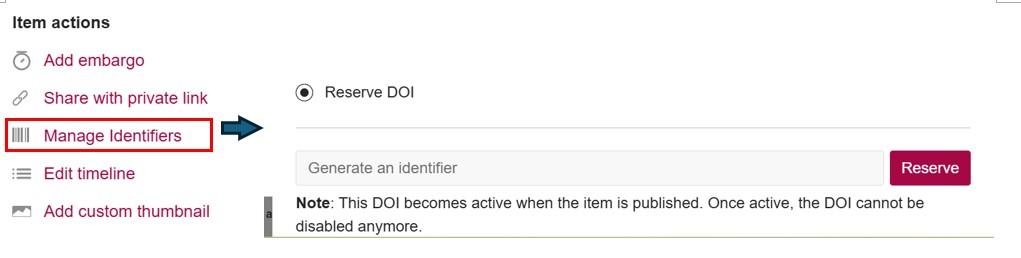 If you wish to reserve the DOI for your forthcoming research output, you can do so via the Manage Identifiers function.
1. Select the radio button “Reserve DOI”.
2. Click on “Reserve” and a DOI will be generated and reserved.
3. The DOI will be activated once the item is published.
Please contact the Library at libadmin@suss.edu,sg for guidance.
How do I access, ICON, the Institutional Repository of SUSS? - Library FAQs
What are the objectives of an Institutional Repository? - Library FAQs
Who can deposit in ICON? - Library FAQs
Do I only upload research papers published during my tenure at SUSS? - Library FAQs
How do I edit my work which had been made public? - Library FAQs
How do I share the repository access with collaborators and funder? - Library FAQs
How do I update my name in ICON? - Library FAQs
How do I compile and curate thematic resources in ICON? - Library FAQs
How many research works can I submit to ICON each time? - Library FAQs
How do I deposit my postgraduate thesis? - Library FAQs


